domd
✓ DoMD - Do Markdown Docs
![]()
![]()
![]()
![]()
DoMD (Do Markdown Docs) is a powerful tool that helps you maintain up-to-date project documentation by automatically detecting, running, and documenting commands from your project files. It generates and updates TODO.md and DONE.md files based on command execution results, making it easier to track what works and what needs attention.
# Start DoMD analyzer
domd
Web Interface
DoMD comes with a modern web interface that allows you to interact with your project’s commands through a user-friendly dashboard.
Starting the Web Interface
# Start the web interface on default port (3000)
domd web

# Specify a custom port
domd web --port 8088

# Start without automatically opening a browser
domd web --no-browser
Web Interface Features
- Command Management: View, run, and manage all your project commands from one place
- Real-time Output: See command execution results in real-time
- History Tracking: Keep track of command execution history
- Responsive Design: Works on both desktop and mobile devices
- Dark Mode: Built-in dark theme for comfortable viewing
Requirements
- Node.js 16+ and npm 8+
- Python 3.9+
- Modern web browser (Chrome, Firefox, Safari, or Edge)
Web Interface Setup
-
Start the web interface:
domd web --port 8088 -
Open your browser and navigate to http://localhost:8088
-
The interface will automatically detect and display your project’s commands
Development Mode
For development, you can run the frontend and backend separately:
# Terminal 1 - Start the backend API
cd backend
python -m domd.api

# Terminal 2 - Start the frontend development server
cd frontend
npm start
✨ Core Features
- Automatic Command Detection - Discovers and extracts commands from various project files
- Smart Execution - Runs commands and captures their output and status
- Docker Integration - Execute commands in isolated containers for consistency
- Command Testing - Validate and test commands in Docker containers
- Smart .doignore Management - Automatically update ignore patterns based on test results
- Comprehensive Reporting - Generates detailed reports in markdown format
- Customizable - Configure includes, excludes, and command behavior
- Cross-Platform - Works on Linux, macOS, and Windows
- Extensible - Add support for new command types and tools
- REST API - Full programmatic access to all features
Demo

Examples
Explore our comprehensive collection of examples to get started with DoMD:
- Basic Examples - Simple examples to get you started
- Advanced Usage - Complex scenarios and custom configurations
- Web Interface Guide - How to use the DoMD web interface
- CI/CD Integration - Automate documentation with GitHub Actions and more
- Integration Examples - Using DoMD with other tools and platforms
Command Testing
DoMD includes powerful command testing capabilities that help you validate and test shell commands in isolated Docker containers:
# Test individual commands
domd test-commands "ls -la" "pwd" "echo Hello"

# Test commands from a file and update .doignore
domd test-commands --update-doignore -f commands.txt

# Skip Docker testing (only validate commands)
domd test-commands --no-docker -f commands.txt
Testing Features
- Command Validation: Automatically detect valid shell commands vs documentation
- Docker Testing: Test commands in isolated containers
- Automatic .doignore Updates: Update ignore patterns based on test results
- REST API: Full programmatic access to testing features
For more details, see the Command Testing Documentation.
Quick Start
Prerequisites
- Python 3.8 or newer
- pip (Python package manager)
- (Optional) Docker for containerized execution
Installation
Choose the installation method that works best for you:
1. **Install DoMD** (if not already installed):

   ```bash
   pip install domd
Or using Docker (no installation required):
docker run --rm -v $(pwd):/app ghcr.io/wronai/domd domd
Basic Usage
-
Navigate to your project directory:
cd /path/to/your/project -
Run DoMD:
# Basic scan
domd
Or use the web interface:
domd web
Web Interface Overview
DoMD includes a secure web-based interface for a more interactive experience:
Web Interface Setup
# Start the web interface (default port: 3003)
domd web

# Specify a custom port
domd web --port 8088

# Start without opening browser automatically
domd web --no-browser

# Start with specific host binding
domd web --host 0.0.0.0
DoMD will:
- Scan your project for available commands
- Execute the commands in the correct context
- Generate a report in
TODO.mdwith any issues found - Update
DONE.mdwith successfully executed commands
Common Commands
- List available commands without executing them:
domd --list - Run a specific command by name or pattern:
domd run test domd run "test*" - Generate a report without executing commands:
domd --dry-run - Get help with available options:
domd --help
Pro Tip: Run
domdregularly to keep your project documentation in sync with your actual project state!
Web Interface
DoMD comes with a web-based interface for a more interactive experience. Here’s how to get it running:
Development Prerequisites
- Node.js (v14 or later)
- npm (comes with Node.js) or Yarn
Running the Development Server
-
Navigate to the frontend directory:
cd frontend -
Install dependencies:
npm install # or if you use Yarn: # yarn -
Start the development server:
npm start # or if you use Yarn: # yarn start -
Open your browser and visit http://localhost:3003
Building for Production
To create a production build:
cd frontend
npm run build
# or with Yarn:
# yarn build
This will create an optimized production build in the build directory.
Documentation
For detailed documentation, please visit our documentation site or check the docs directory.
Contributing
Contributions are welcome! Please read our Contributing Guide for details on how to get started.
License
This project is licensed under the Apache 2.0 License - see the LICENSE file for details.
Need Help?
Open an issue if you need help or have questions.
Pattern Matching
- Patterns support glob-style wildcards (
*matches any sequence of characters) - Matches are case-insensitive
Subdirectory README.md Support
DoMD can automatically scan first-level subdirectories for additional README.md files and execute commands found within them. This is particularly useful for monorepos or projects with multiple components.
Local Development
For local development, you can start both the backend and frontend services:
# Start the backend server
poetry run uvicorn domd.main:app --reload --port 8008

# In a separate terminal, start the frontend
cd frontend
npm install
npm start
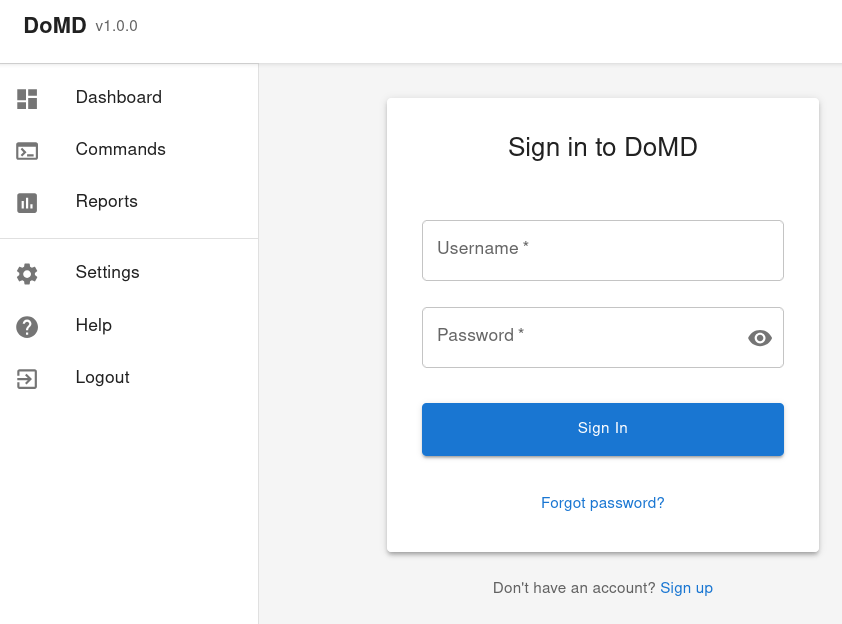
Authentication and Login
The web interface is protected by authentication. Use the following default credentials:
- URL: http://localhost:3000 (frontend development server) or http://localhost:3003 (production build)
- Username: admin
- Password: admin123
- URL: http://localhost:3000 (frontend development server) or http://localhost:3003 (production build)
- Username: admin
- Password: admin123
Security Note
Change the default password after first login by navigating to User Settings in the web interface.
First-Time Login
- Open your web browser and navigate to http://localhost:3000 (development) or http://localhost:3003 (production)
- Enter the default credentials:
- Email/Username:
admin - Password:
admin123
- Email/Username:
- Click “Sign In”
- Immediately change your password in the User Settings menu
Web Interface Features
- Secure Login: Protected by username/password authentication
- Interactive Dashboard: View command execution results in real-time
- Command History: Browse through previously executed commands
- Filtering: Filter commands by status, type, or search term
- Detailed Views: See full command output and execution details
- User Management: Manage users and permissions (admin only)
- Responsive Design: Works on desktop and mobile devices
Troubleshooting Login Issues
If you’re having trouble logging in:
- Ensure the backend server is running (check terminal for errors)
- Verify the frontend is properly connected to the backend (check browser’s developer console for errors)
- Clear your browser cache and cookies if experiencing persistent login issues
- Check that your credentials are correct (default: admin/admin123)
- If you’ve forgotten your password, you can reset it by:
- Stopping the server
- Deleting the
domd.dbfile (or your configured database file) - Restarting the server (this will recreate the database with default credentials)
Then:
- Open http://localhost:3003 in your browser
- Log in with the default credentials
- Navigate to Settings > Users to change the default password
- (Optional) Create additional users with appropriate permissions
Prerequisites
To use the web interface, you’ll need:
- Node.js (v16 or later) and npm (v8 or later)
- Python 3.8+ with DoMD installed
- Internet connection (for loading external resources)
- Modern web browser (Chrome, Firefox, Safari, or Edge)
Basic Command Line Usage
-
Navigate to your project directory:
cd /path/to/your/project -
Run DoMD with the web interface:
# Start the web server domd web # The interface will be available at http://localhost:3003 by default -
Open your browser and navigate to the displayed URL
Advanced Command Line Usage
For command-line usage, you can run:
domd
DoMD will:
- Scan your project for available commands
- Execute the commands in the correct context
- Generate a report in
TODO.mdwith any issues found - Update
DONE.mdwith successfully executed commands
Common Commands
- List available commands without executing them:
domd --list - Run a specific command by name or pattern:
domd run test domd run "test*" - Generate a report without executing commands:
domd --dry-run - Get help with available options:
domd --help
💡 Pro Tip: Run
domdregularly to keep your project documentation in sync with your actual project state!
🌐 Web Interface
DoMD comes with a web-based interface for a more interactive experience. Here’s how to get it running:
Development Prerequisites
- Node.js (v14 or later)
- npm (comes with Node.js) or Yarn
Running the Development Server
-
Navigate to the frontend directory:
cd frontend -
Install dependencies:
npm install # or if you use Yarn: # yarn -
Start the development server:
npm start # or if you use Yarn: # yarn start -
Open your browser and visit http://localhost:3003
Building for Production
To create a production build:
cd frontend
npm run build
# or with Yarn:
# yarn build
This will create an optimized production build in the build directory.
📖 Documentation
For detailed documentation, please visit our documentation site or check the docs directory.
🤝 Contributing
Contributions are welcome! Please read our Contributing Guide for details on how to get started.
📄 License
This project is licensed under the Apache 2.0 License - see the LICENSE file for details.
💡 Need Help?
Open an issue if you need help or have questions.
Pattern Matching
- Patterns support glob-style wildcards (
*matches any sequence of characters) - Matches are case-insensitive
📂 Subdirectory README.md Support
DoMD can automatically scan first-level subdirectories for additional README.md files and execute commands found within them. This is particularly useful for monorepos or projects with multiple components.
How It Works
- DoMD scans all first-level subdirectories in your project
- For each subdirectory containing a
README.mdfile:- Commands are extracted from the
README.md - Commands are executed with the subdirectory as the working directory
- Command output and results are included in the main report
- Commands are extracted from the
Example Project Structure
my-project/
├── README.md           # Commands run from project root
├── frontend/
│   └── README.md      # Commands run from frontend/
├── backend/
│   └── README.md      # Commands run from backend/
└── docs/
    └── README.md      # Commands run from docs/
Benefits
- Keep commands close to the code they relate to
- Maintain separate command sets for different project components
- Simplify complex project automation
- Commands run in their proper context
🐳 Running Commands in Docker with .dodocker
For better isolation and consistency, you can specify commands that should be executed inside a Docker container using a .dodocker file.
.dodocker File Format
# Commands to run in Docker container
pytest
black --check .
flake8
mypy .
How It Works
- Each line specifies a command that should be run in a Docker container
- Commands are executed in the
python:3.9container by default - The project directory is mounted to
/appin the container - The working directory is set to
/app - The container is automatically removed after execution
Customizing Docker Configuration
You can customize the Docker configuration by creating a Dockerfile in your project root. For example:
FROM python:3.9

# Install additional dependencies
RUN apt-get update && apt-get install -y \
    gcc \
    libpq-dev \
    && rm -rf /var/lib/apt/lists/*

# Install Python dependencies
COPY pyproject.toml poetry.lock ./
RUN pip install poetry && \
    poetry config virtualenvs.create false && \
    poetry install --no-interaction --no-ansi
DoMD will automatically detect and use this Dockerfile when running commands in a container.
🤖 Programmatic Usage
from domd import ProjectCommandDetector

# Initialize detector
detector = ProjectCommandDetector(
    project_path="./my-project",
    timeout=60,
    exclude_patterns=["*.pyc", "__pycache__/*"]
)

# Scan for commands
commands = detector.scan_project()
print(f"Found {len(commands)} commands")

# Test commands
detector.test_commands(commands)

# Generate report
detector.generate_output_file("RESULTS.md", "markdown")

# Access results
failed_commands = detector.failed_commands
success_rate = (len(commands) - len(failed_commands)) / len(commands) * 100
print(f"Success rate: {success_rate:.1f}%")
🧪 Development
Setup Development Environment
git clone https://github.com/wronai/domd.git
cd domd
poetry install --with dev,docs,testing

# Install pre-commit hooks
poetry run pre-commit install
Running Tests
# Run all tests
poetry run pytest

# Run with coverage
poetry run pytest --cov=domd --cov-report=html

# Run specific test categories
poetry run pytest -m "unit"
poetry run pytest -m "integration"
Code Quality
# Format code
poetry run black src/ tests/
poetry run isort src/ tests/

# Linting
poetry run flake8 src/ tests/
poetry run mypy src/

# All quality checks
make lint
Building Documentation
# Serve locally
poetry run mkdocs serve

# Build static site
poetry run mkdocs build
🤝 Contributing
Contributions are welcome! Please feel free to submit a Pull Request. For major changes, please open an issue first to discuss what you would like to change.
Adding New Parsers
To add support for a new project type, follow these steps:
- Create a parser in
src/domd/parsers/ - Implement the parser interface
- Add tests in
tests/parsers/ - Update documentation
Example parser structure:
from .base import BaseParser

class NewProjectParser(BaseParser):
    def can_parse(self, file_path: Path) -> bool:
        return file_path.name == "config.yaml"

    def parse_commands(self, file_path: Path) -> List[Dict]:
        # Implementation here
        pass
📄 License
This project is licensed under the Apache License 2.0 - see the LICENSE file for details.
🙏 Acknowledgments
- Inspired by the need for automated project health monitoring
- Built with Poetry for dependency management
- Uses pytest for testing framework
- Documentation powered by MkDocs
📊 Project Stats
- Languages Supported: 10+
- File Types Detected: 20+
- Command Types: 50+
- Python Versions: 3.8+
🔗 Links
💡 Use Cases
- Pre-deployment Checks: Verify all project commands work before deployment
- CI/CD Integration: Add as a quality gate in your pipeline
- Onboarding: Help new developers identify setup issues
- Project Maintenance: Regular health checks for legacy projects
- Documentation: Generate comprehensive command documentation
⚡ Quick Examples
CI/CD Integration (GitHub Actions)
name: Project Health Check
on: [push, pull_request]

jobs:
  health-check:
    runs-on: ubuntu-latest
    steps:
    - uses: actions/checkout@v3
    - name: Setup Python
      uses: actions/setup-python@v4
      with:
        python-version: '3.9'
    - name: Install DoMD
      run: pip install domd
    - name: Run Project Health Check
      run: domd --verbose
    - name: Upload TODO.md if failures
      if: failure()
      uses: actions/upload-artifact@v3
      with:
        name: failed-commands
        path: TODO.md
Make Integration
.PHONY: health-check
health-check:
	@echo "Running project health check..."
	@domd --quiet || (echo "❌ Some commands failed. Check TODO.md" && exit 1)
	@echo "✅ All project commands working!"

.PHONY: health-report
health-report:
	@domd --dry-run --verbose
Pre-commit Hook
# .pre-commit-config.yaml
repos:
  - repo: local
    hooks:
      - id: domd-check
        name: Project Command Health Check
        entry: domd
        language: system
        pass_filenames: false
        always_run: true